Monthly Archives: September 2016

Correctly testing and soldering guitar cables

Often poorly soldered or damaged guitar cables are the reason when the guitar signal sounds dull or too quiet. With an Ohm meter, the cables can be easily measured. But often guitar cables are not only soldered incorrectly, but also measured incorrectly. Therefore, I would like to explain you in this blog article how you test guitar cables properly and what you have to pay attention to when soldering the cable.

Testing guitar cables properly:

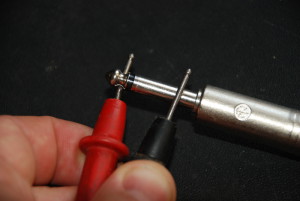
Testing guitar cables

Correctly testing guitar cables

  • The plugs must be on a non-conductive surface. A carpet is not suitable for measuring, because a carpet builds static charges.
  • Do not touch the plugs of your guitar cable nor the tips of the testing cables with your fingers. Otherwise you will measure the resistance of your own body.
  • The resistance between the tip of one plug and the tip of the other plug may be only a few Ohms. Ideally, the resistance is less than one Ohm.
  • The resistance between the sleeve (shield) of one plug and the sleeve of the other plug may be only a few Ohms. Ideally this resistance is less than one Ohm.
  • But the most important thing is – and most people do not measure it – the resistance between sleeve and tip. You just have to measure on one side of the guitar cable. This resistance should be infinite, meaning have no connection (open loop). Cables that were soldered incorrectly or too hot, or cables that are mechanically heavily loaded, can have a resistance here. If this resistance is near zero Ohms, then the cable has a short circuit. When the measurement is in kilo or mega Ohm range, the cable has a resistance, which can lead to dynamics, treble and volume losses.

Soldering guitar cables correctly:

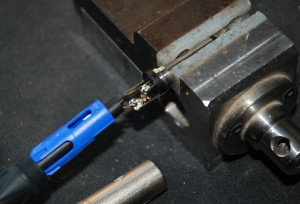
Soldering Guitar Cable

Correctly Soldered Guitar Cable

  • Strip the outer covering of the cable, paying attention to the correct length (with Neutrik plugs, these are 2cm). Take care to not damage any braid of the shield.
  • Separate the braids of the shield from the center conductor and organize (twist) them into a single wire, thus resulting in a single conductor. Here you have to make sure that no individual braid sticks out.
  • If the shield has an additional aluminum foil, you have to cut off it (to the same length as the cable is stripped).
  • Depending on the connector type you use, the previously twisted shield conductor must be shorten. The screen must not touch the middle pin (signal conductor) of the plug in any way.
  • Strip the inner signal conductor of the cable only a little (3- 4mm) and also twist the braids.
  • Before you solder the cable to the connector, you must tin the the signal and shield conductors of the cable.
  • Also tin the solder joints of the plug previously.
  • Solder the shield first, and then the signal conductor.
  • And now the most important: DO NOT SOLDER TOO HOT and not too long! Make the solder on the plug just briefly liquid, then tuck the cable end immediately into it and wait to cool. You must work swiftly. Do NOT stick the cable to the plug while continue heating the solder for more than a second or two. The cable ends must not move during cooling down, otherwise it results in a so-called “cold joint”. The solder must be smooth and not completely frosted after cool down.

=> The plastic parts of the cable must not melt. Otherwise it may cause the above-mentioned resistance which results in signal loss.

IMPORTANT: There are also cables with conductive plastic, for example, Mogami. Here you have to observe the manufacturer’s instructions.

Here is a link to a Youtube video where everything is very well explained:
https://www.youtube.com/watch?v=nE9P67_E5N8

Gitarrenkabel richtig löten und testen

Oft sind schlecht gelötete oder defekte Gitarrenkabel schuld, wenn das Gitarrensignal dumpf oder zu leise klingt. Mit einem Ohm-Meter können die Kabel ganz einfach ausgemessen werden. Oft werden aber Kabel nicht nur falsch gelötet, sondern auch falsch gemessen. Deshalb möchte ich Dir heute erklären, wie Du Gitarrenkabel richtig testest und worauf Du beim Löten der Kabel achten musst.

Gitarrenkabel richtig testen:

Gitarren Kabel testen

Gitarren Kabel richtig testen

  • Die Stecker müssen auf einem nicht leitenden Untergrund liegen. Ein Teppich eignet sich nicht zum Messen, da dieser statische Ladungen aufbaut.
  • Du darfst mit Deinen Fingern weder die Stecker noch die Testspitzen der Messgeräte-Kabel berühren. Andernfalls misst Du den Widerstand Deines eigenen Körpers mit.
  • Der Widerstand zwischen der Spitze des einen Steckers und der Spitze des anderen Steckers darf nur ganz wenige Ohm betragen. Idealerweise liegt der Widerstand unter einem Ohm.
  • Der Widerstand zwischen der Masse des einen Steckers und der Masse des anderen Steckers darf nur ganz wenige Ohm betragen. Idealerweise liegt auch dieser Widerstand unter einem Ohm.
  • Das wichtigste ist aber – und dies messen die meisten gar nicht – der Widerstand zwischen Masse und Spitze. Hier reicht es, auf einer Seite des Gitarrenkabels zu messen. Dieser Widerstand sollte unendlich hoch sein, also keine Verbindung haben. Kabel, die falsch oder zu heiss gelötet wurden, oder Kabel die mechanisch zu stark belastet wurden, können hier einen Widerstand haben. Wenn dieser Widerstand in der Nähe von null Ohm liegt, dann hat das Kabel einen Kurzschluss. Wenn die Messung im Kilo- oder Mega-Ohm-Bereich liegt, hat das Kabel einen Widerstand, der zu Dynamik-, Höhen- und Lautstärkeverlusten führen kann.

Gitarrenkabel richtig löten:

Gitarrenkabel richtig löten

Korrekt gelötetes Gitarrenkabel

  • Achte beim Abmanteln (Entfernen der äusseren Gummihülle) auf die richtige Länge (bei Neutrik-Steckern sind es z.B. 2cm) und darauf, dass Du die Litzen der Abschirmung nicht verletzt.
  • Die äusseren Litzen (die Abschirmung) musst Du verdrillen, so dass sich ein einzelner Leiter ergibt. Hier musst Du unbedingt darauf achten, dass keine einzelne Litze absteht.
  • Falls die Abschirmung des Gitarrenkabels eine zusätzliche Aluminium-Folie besitzt, musst Du diese entfernen (gleich lang, wie das Kabel abgemantelt ist).
  • Je nach Stecker-Typ musst Du die zuvor verdrillten Litzen etwas kürzen. Die Abschirmung darf den mittleren Pin (Signal-Leiter) des Steckers auf keinen Fall berühren.
  • Den inneren Signal-Leiter nur ganz kurz abisolieren (3- 4mm) und ebenfalls verdrillen.
  • Die beiden Kabelenden (also den Signalleiter und die Abschirmung) verzinnen.
  • Auch beim Stecker die Lötstellen verzinnen.
  • Löte zuerst die Abschirmung an, und dann den Signalleiter.
  • Und jetzt das wichtigste: NICHT ZU HEISS und nicht zu lange löten! Den Zinn am Stecker also nur kurz flüssig machen, dann sofort das Kabelende reinstecken und auskühlen lassen. Das Kabel NICHT an den Stecker kleben, indem das Lot überer mehrere Sekunden weiterhin erwärmt wird! Das Kabelende darf während des Auskühlens auch nicht wackeln, sonnst entsteht eine so genannte “kalte Lötstelle”. Die Lötstelle muss nach dem Auskühlen glatt sein und darf nicht komplett matt werden.

=> Die Kunststoffteile der Kabel dürfen nicht schmelzen. Andernfalls kann der oben erwähnte Widerstand entstehen, der zu Signalverlusten führt.

WICHTIG: Es gibt auch Gitarrenkabel mit leitendem Kunststoff, z.B. von Mogami. Hier musst Du unbedingt die Hinweise des Herstellers beachten.

Hier noch ein Link zu einem Youtube Video, wo das alles sehr gut erklärt wird (englisch):
https://www.youtube.com/watch?v=nE9P67_E5N8
Die Zeitschrift “Gitarre & Bass” hat im Herbst 2016 Gitarren- & Basskabel ausführlich getestet. Du kannst das Special zum Gitarren Kabel Test gratis downloaden.